Tuesday, December 24, 2013

Beer Label Coasters

coasters 2

My daughter made these beer label coasters to give to her boyfriend for Christmas this year and because I am more than positive that he is not a regular Pickles and Cheese blog reader, I felt it was safe enough to post these photos and not ruin the surprise.  : )

Coasters 1     Coasters 4

It is so nice to see her creative side emerging.  Especially since mine has been on somewhat of a hiatus! 

The idea was spotted on Pinterest and you can get How-To instructions from Attic Lace. 

I will definitely be making a set for myself one of these days.  Just need to start collecting the beer carriers.  Might require some craft brew experimentation!

Tough job but it’s all in the name of a quality craft project.

Merry Christmas Everyone!!

Sunday, December 22, 2013

Cranberry Pistachio Biscotti

biscotti 1
My new favorite Christmas cookie this year has to be these Cranberry Pistachio Biscotti.  Gave away most of the last batch I made and will be making another in the next few days.  These are awesome!
Biscotti 3
Cranberry Pistachio Biscotti

Original recipe makes 3 dozen

1/4 cup light olive oil

3/4 cup white sugar

2 teaspoons vanilla extract

1/2 teaspoon almond extract

2 eggs

1 3/4 cups all-purpose flour

1/4 teaspoon salt

1 teaspoon baking powder

1/2 cup dried cranberries

1 1/2 cups pistachio nuts

Optional:  1/2 to 1 cup of melted white chocolate chips

Directions
  1. Preheat the oven to 300 degrees.
  2. In a large bowl, mix together oil and sugar until well blended. Mix in the vanilla and almond extracts, then beat in the eggs.
  3. Combine flour, salt, and baking powder; gradually stir into egg mixture. Mix in cranberries and nuts by hand.
  4. Divide dough in half. Form two logs approximately 12x2 inches on a cookie sheet that has been lined with parchment paper. Dough may be sticky; wet hands with cool water to handle dough more easily.
  5. Bake for 35 minutes in the preheated oven, or until logs are light brown. Remove from oven, and set aside to cool for 10 minutes. Reduce oven heat to 275 degrees F (135 degrees C).
  6. Cut logs on diagonal into 3/4 inch thick slices. Lay on sides on parchment covered cookie sheet.
  7. Bake approximately 8 to 10 minutes, or until dry; cool.
  8. After the cookies are cool, hard, and dry, you can drizzle melted white chocolate on them.  Or dip one end into the melted white chocolate.  To do this, I melted the white chocolate chips in a heat proof Pyrex measuring cup and microwaved them for 30 seconds and then gave them a stir.  I mircowaved and stirred them in 30 second intervals until the chips were melted. 
  9. Using a fork I drizzled the melted chocolate back and forth across the cookies till I liked the way way they looked.  Then set them aside to cool and harden. 

Biscotti Bags

I found the recipe on Allrecipes.com and these cookies are worth raving about.  These are a keeper.  Also fun to give away.  I packaged mine up in some Christmas cellophane bags and tied them up with some ribbon. 

biscotti 2

Thursday, November 28, 2013

Turning A Butcher Block Table Into A Bar Cart

Butcher block 067

Goodwill can be a treasure trove but it’s a hit or miss proposition.   And I have been “missing” a lot lately when it came to finding something worthwhile there.    And then on particular day when my daughter and I were driving home from an afternoon of shopping I said “let’s pop in here and see what we can find” and I turned the wheel and quickly parked the car.   This awesome butcher block table was sitting all by it’s lonesome when I first spotted it.  But not 5 seconds after I saw it a man and his daughter started eyeballing it and giving it a very through look over. He seemed very very very interested.  He looked  it over top to bottom.  I could see the wheels turning in his head…kind of like the way they were turning in my head too.  

Butcher Block from Goodwill     Butcher block 060

                      BEFORE       AFTER

And then it seemed like he got my telepathic message as I willed him to “just move on…jut move on….you really don’t want that…you really don’t want that”… and miraculously he and his daughter did!  They walked away and inspected a few other things in the furniture area.  But as soon as he walked on, I sidled up to that butcher block place  a hand on top of it to stake my claim and instructed my daughter to go and get a cart while I stood by and guarded it.  It was extremely heavy but somehow we managed to balance it on top of a shopping cart and too it to the cash register.  I happily paid the $25.00 fee and we took it out and loaded into the back of the car.  I could easily see this being used as a bar table and thought I could fix it up for my daughter’s new apartment.   Kelsey liked the idea.  A lot.  : )

Butcher Block with my shadow     Butcher Block Primed with Kilz

First step was to wipe the piece down with a cloth and I quickly sanded the top with a sandpaper block.  Next I sprayed on a fresh coat of Kilz primer to seal it.  The top of the butcher block was looking tough.  It had lots of dark spots, water marks, and what looked almost like scorch marks probably from setting hot pots and pan directly on it. 

It was a nice Fall-ish day when I sprayed the table down with Kilz primer.  And the sun in the sky that day was making for some rather long shadows.  I am only about 1/10th that height in real life! : )

Butcher Block Wiz Roller     Butcher block5     Table Painted first coat

The days are getting shorter and it’s getting darker much earlier.  Colder too.  So I decided to bring the table indoors to paint and set up shop in my kitchen.   I used a black paint with an eggshell finish by Rustoleum.  A couple of very cheap brushes and my new favorite painting tool called The Whizz Roller!  These little mini paint rollers are so easy to use and control and make any paint job you have easier and faster.  I found mine at Lowes’ Hardware.

Butcher block 064    

There were some very unattractive wood pegs on both sides of the table that I removed.  You can see them in the photo above when I painted it white with the Kilz primer.  I removed them and then wanted something to cover up the round holes left behind.  I found a couple of Hooks that had a square plate I screwed into the wood apron on the sides and they covered the holes nicely.  On the opposite side I added an extra wide bar drawer pull and mounted that directly over the holes on the other side and it serves very nicely as a bar to hang a towel. 


Butcher block 071

And then there my favorite piece of hardware that I found at Target…..a bottle opener that I mounted near the top of one of the table legs on the front. 

Butcher block 066

I really wish I could keep this.  But, alas, it’s already promised to someone else.  I’ll have to keep my eyes open for another one.

Butcher block 053

Could I be so lucky twice?  : )

Tuesday, September 24, 2013

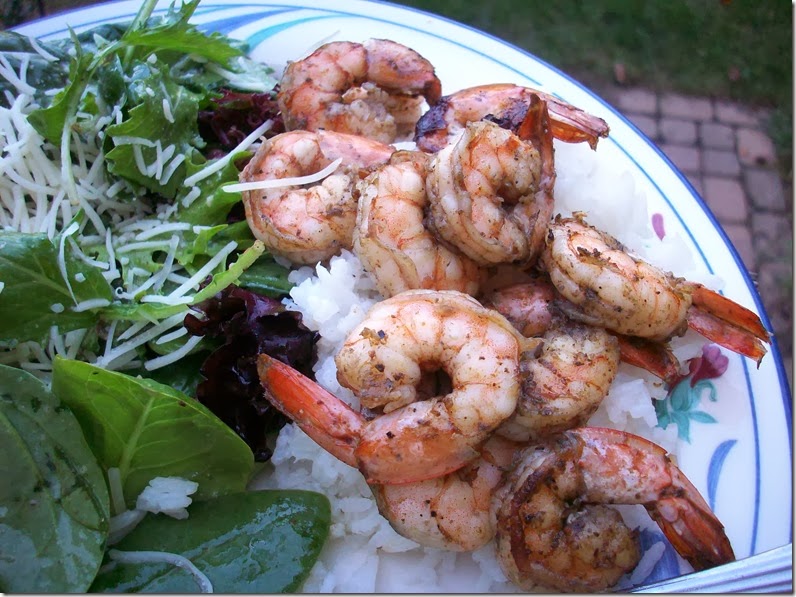
Grilled Shrimp Scampi

September 13 007

This is one of those great things to eat that you say to yourself…all these years I could have been living large and eating shrimp this way! 

If you like Shrimp Scampi and really…who doesn’t?  And if you love the smoky flavor you get from a grill, this is a great recipe to try because you get a smoky  AND  garlicky buttery flavor from grilling up your shrimp this way.  I have a grill basket and I tell you it was made for making something like this.  I also think this has less calories than the traditional Shrimp Scampi you might order in a restaurant simply because most of the butter and olive oil in the recipe drip off as the shrimp is grilling but it still leaves all the garlicky flavor and goodness. 

Here is the recipe:

Grilled Shrimp Scampi

2 lbs. of raw, peeled shrimp.  (I use the the kind that are peeled but still have the tail shells on them.)  They need to be thawed out.

1/2 stick of butter (1/4 cup), softened

1/4 cup of olive oil

4 large gloves of garlic, pressed (or 1 Tbsp….  the more garlic the better) ;)

1/2 tsp. Kosher salt

1/4 tsp. black pepper

1/2 tsp. paprika

Mix the softened butter, olive oil, and garlic together in a large bowl.  Sprinkle with the salt, pepper, and paprika. 
September 13 003

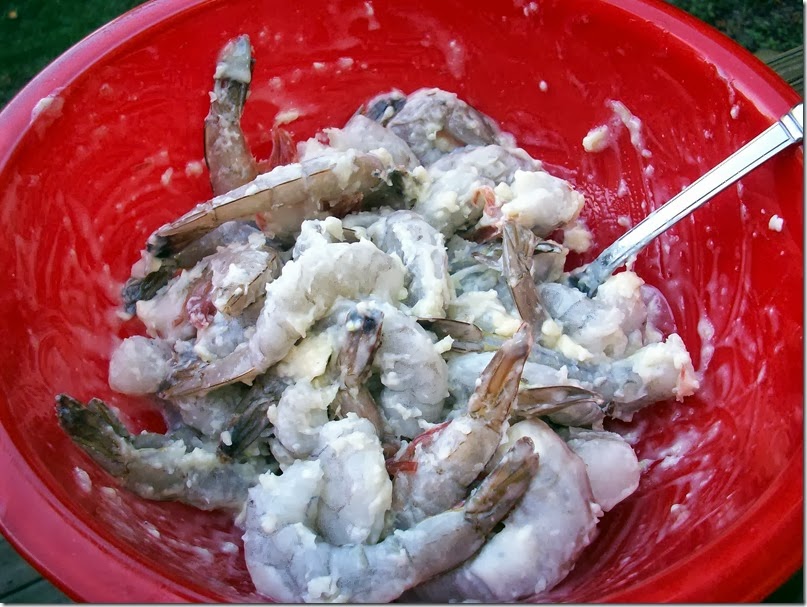
Add the thawed shrimp and mix well till all the shrimp are nicely coated with the garlic, butter, olive oil mixture. 

Not very appetizing to look at but this shot gives you a good idea on how they will look before you put them on the grill. 

Preheat your grill and get it nice and hot….I have a gas grill and I brought it up to about 500 degrees with the grill basket in it so it was nice and hot when I added the shrimp.  The shrimp grills up very quickly and be careful when you add it to the basket because it will “flame” up on you because of the oil and the butter.  I used a pair of tongs and tossed the shrimp as they cooked.  And there was LOTS of SMOKE and lots of smoke is good…it adds so much flavor you will see.  They cook up quickly and you will cook them until they reach that pink peachy color.  Some will also pick up some of the color from all the smoke. 

September 13 006

This was so delicious.   I served it on a bed of Jasmine Rice and a most awesome salad that I will post the dressing recipe for it in the next few days.  That salad is incredible!  But that is a blog post for another day. 

This is a quick and easy dinner and it’s what I would call restaurant quality!  Enjoy if you give this one a try.

Thursday, August 22, 2013

Coffee Table Covered with Glass Tiles

Coffee Table 1

Yep, it’s really me posting something new to the the blog!  I seem to have taken an extended break from writing.  It just kind of happened.  To those of you who sent me notes to check on me…thanks for thinking of me.  It’s nice to know I was missed!  It just kind of happened…guess I needed a break and it’s nice to back today posting something new. 

Since I last posted my daughter has graduated from college…found her first job….(we are so proud)…and moved into her first apartment.  We did some budget shopping for her new place and this was a project I completed about a month ago as my contribution to her new home.  She needed a coffee table so it was off to Goodwill to see what I could find.  And this sweet and very small coffee table was found and purchased for $10.00.  Such a deal!

I love the look of glass tiles…they are very big in home tile projects for both the kitchen and bath now days.  I like how they are transparent and the tiles I picked have the look and color of sea glass.  Not to be confused with my new favorite wine called Sea Glass which is a Sauvignon Blanc and can be found in my area at Whole Foods, Harris Teeter, and World Market.   It’s possible a glass or two was consumed during the course of this project but…I digress…. :)  (It’s an awesome white wine…if you see it buy it!!)

      Coffee Table Before

Anyway….back to the table!       First think I did was wipe off all the cobwebs and then washed it down and let it dry.  At first I thought I could get away with spray painting it but it wasn’t covering very well and was looking kind of blotchy so I then decided to hand paint paint it with some leftover cream colored paint that I had left over from an old project.  I gave the whole table 2 coats with a brush and let it dry in between coats.  Then after the table was completely dry…


     Coffee Table 2

I let it sit over night……I waxed the table with some Annie Sloan Soft Wax.  This was something I just had to have and I asked for it last Christmas.  This was the first time I had a chance to use it.  I realize that it should have been used along with Annie Sloan Paint but I was impatient and wanted to use up some of my old paint in the garage from some former projects.  And I LOVE that brush!!

Next I purchased the glass tiles from Michael’s craft store.  I purchase 6 bags for $1.99 each thinking that would be plenty.  Wow was I wrong….6 bags didn’t quite cover half of the table.  So I went back and purchased 8 more bags from another Michaels’ store because I had wiped the first location out!  Surprisingly, still not enough and and additional couple of bags were required.  In the end, my daughter didn’t like the red glass tiles so she pulled all of them out and so the final project was covered only with the blues, greens, and the clear tile..  Gives the table a more “beachy” look I think.  It was also decided that we wouldn’t glue the tiles down as originally intended.  The tiles fit together so nicely and I didn’t want to risk seeing the glue through the clear tiles after they were dried.  So, since gravity is our friend and we thought it might be fun to pick up tiles and rearrange and maybe spell words out with them on the table…we left them unglued.  Just pick a glue that says it dries clear if you want something more permanent.


Coffee Table 3

This was a fun and easy project…and did I mention cheap too?

Monday, May 6, 2013

Sartori Chai Cheese

Sartori Chai Cheese

Have you tried any of the Sartori brand cheeses yet?   Delicious!

I was at a wine and cheese tasting last week and this Chai flavored Sartori was one of the cheeses featured. 

It was very popular!  And highly recommended!

Sunday, March 31, 2013

Baked French Toast

French Toast 014

It always seems to take me longer to catch on to most things.  And this would be a perfect example.  Baked French Toast.  It’s nothing new and everybody else in the world makes it all the time but I made this today for the first time for our Easter brunch.  It was amazing!  Of course I found it on Pinterest and it comes from a 2009 post on a blog called Rach’s Blog.  Here’s the recipe:

Baked French Toast

1/2 cup melted butter (1 stick)

1 cup brown sugar

1 loaf Texas toast ( I used a loaf of French Bread and sliced it into 1/2 to 1 inch thick slices.)

4 eggs

1 1/2 cups of milk

1 tsp. vanilla

Optional:  Powdered sugar and cinnamon sugar

Directions:

I baked mine in a 9” x 13” Pyrex Glass baking pan.

Melt butter in microwave and mix with brown sugar and spread evenly in baking pan. 

( I placed a stick of butter in the Pyrex pan and melted it in the microwave.  Then I mixed in the brown sugar.)

Beat eggs, milk, & vanilla
Lay single layer of your bread in pan on top of the butter and brown sugar.  
Spoon 1/2 of egg mixture on bread layer. (I then used a pastry brush to make sure each piece of bread has egg mixture on it.)
Add 2nd layer of Texas Toast
Spoon on remaining egg mixture, Sprinkle with cinnamon an sugar if desired.

French Toast 002     French Toast 005


Cover & chill in fridge overnight  ( baked mine right away and it was delicious.  But I can see how making it the night before would be so convenient and make life easier. )    Cover with foil and bake at 350 for 30 minutes .  Remove the foil and bake for an additional 15 minutes. 

French Toast 011

Sprinkle with powdered sugar and serve with warm maple syrup.


 French Toast 019    

And here is a shot of the back side where the butter and brown sugar mixture turns to a decadent, caramel like crust! 

Truly sinful and your family and guests will love you for it!  Enjoy!