Monday, March 11, 2013

Hirten Cheese


Castello Alps Selection Hirten

I have a new cheese to recommend! The name of it is Hirten and the company who makes it is Rosenborg Castello.  I am starting to see it in all of my stores and today was the first time I got a chance to taste it.  Delicious!  It reminds me a little bit of one of my favorite cheeses called Parrano.  I would describe it as a cross between Parmesan Reggiano and an aged Gouda.  

Hirten is a cow’s milk cheese from the Bavarian Alps region in Germany.  The cows are raised on small mountain farms in the Alps. Each farm is at least 2,625 feet above sea level, and has fewer than 20 cows. I love that.  Can’t you just picture it?   It’s what make the difference in a truly flavorful cheese.  Happy cows, produce happy milk, which makes for a happy and delicious cheese!!  

Hirten is aged for 9 months and has a rich yellow/orange color and a crumbly, dry texture.  This cheese has the  crunchy protein crystals that I love so much.  Almost like mini bursts of flavor and I think the sign of a well aged cheese.   It has a rich, sharp, complex taste that I would describe as a slightly sweet caramel taste and the manufacturer says it has a a hint of pine.  I don’t think my palate if refined enough yet to detect the “pine” but I will keep that in mind each time I taste it!

Hirten Cheese

Serving ideas for Hirten would be to pair it with a lager beer, or serve with a full-bodied red wine. If white wine is preferred, serve with a white Bourgogne or Sauvignon Blanc.

So there you have it.  A new cheese to nibble with your favorite glass of wine or an ice cold beer.  I am already looking forward to the weekend and it’s only Monday!

Sunday, March 10, 2013

Springtime, Baby Chicks, and Chicken Coops

Chicks

It’s definitely Springtime here in the South and I know this because daffodils are blooming, the trees are budding and Southern States Farm Supply at the main corner near our neighborhood has baby chicks for sale.  They are so cute!  I have fantasy about raising chickens.  It will stay that way, a fantasy, because the neighborhood association and their gigantic list of rules and covenants prevents us from owning livestock.  Sure wouldn’t want a lien slapped on my house just because I wanted some fresh eggs!  :(

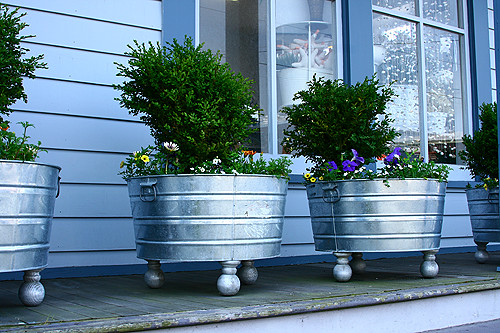
     Galvanized tubs with wooden legs added...what a great container planting idea!

So on Saturday, because the weather was so nice, I decided that I wanted to start looking around for some galvanized tubs because that is how I think I am going to solve my problem of Bermuda grass invading my vegetable garden. I just won’t have a garden! Instead, I am going to try growing my tomatoes in containers this summer. I got the idea when I saw these galvanized tubs on Pinterest.  We went shopping in search of tubs and the first stop was Southern States Farm Supply. And there in a gigantic galvanized tub were dozens of baby chicks. Squeal! :)  So cute!

Heatherbullardcoop-133

I’ve had this little dream for quite a while.  I even blogged about it once back when I saw a photo of what I thought was the worlds’ fanciest chicken coop.  It belongs to Heather Bullard and she has a beautiful blog.  Take a few minutes and take a look.  It would make almost anyone want to raise their own chickens!

My renewed interest in owning chickens began on Friday when I found out that a book I had been looking at while shopping at Anthropologie was available on Kindle from Amazon for only $3.99.  I decided to get it, read it one night, and will probably buy the regular book anyway because I saw so many recipes in it that I wanted to try.  But the book is more than just recipes, it’s a short memoir about how Janice Cole,  the author, ended up with three chickens of her own.  It’s full of recipes, cute stories and fun facts about chickens that I never knew.  Highly recommended.

So that is how our weekend started off.    And so while I didn’t bring home any baby chicks with me and I haven’t ordered a custom chicken coop quite yet,  I do hope to have some new garden tubs to show you very soon!

Is it showing signs of Spring where you live yet? 

Wednesday, March 6, 2013

Lunch Lady Peanut Butter Bars

Lunch Lady Peanut Butter Bars 030

Just the name of this recipe, “Lunch Lady Peanut Butter Bars”  is enough to take me back to my days in elementary school.  And while I don’t specifically remember a lunchroom treat like this one, the words “Lunch Lady” takes me back to the Multi-Purpose Room where we would eat our lunches at Union Lake Elementary.  There was a stage on one end of the room and the floor was green.  This room served not only as a lunch room, complete with that distinct school lunch room aroma,  but as a PTA meeting room,  a school assembly room, a Brownies and Girl Scouts meeting room,  a gym (the knotted climbing ropes were attached to the ceiling.  I could never get past the third knot on those ropes and I had a huge fear of heights so touching the ceiling was never going to happen for me.), and a theater (we did the Prince and the Pauper in the 6th grade).   And then there was Ruth.  Blowing her whistle and yelling “ 5 minutes!  Eat your lunches!”  She was kind of mean.  And you didn’t want to accidentally spill your milk because there were verbal consequences when you did .  She terrified me!

Ok,  I’m back.  Started to drift off there for a minute down memory lane. :)

These  bars are definitely NOT what you would call a  low carb” dessert.  But oh my, are these a tasty treat!  There are a multitude of recipes for these bars floating around on Pinterest and they have been tempting me to give them a try for quite a while.  The recipe I decided to go with came from the blog Tried and Tried Again.  I made these last night after getting the bug to bake.  They took about an hour so they are not what you would call quick and there are three steps to them so I wouldn’t come right out and say they are easy but really, they are.  They just take a bit of time.  Definitely worth it.

Lunch Lady Peanut Butter Bars

1 1/2 cups Flour

1¼ tsp. Salt

½ tsp. Baking Soda

¾ cup Butter

¾ cup Sugar

¾ cup Brown Sugar

1 ½ tsp. Vanilla

1 1/2 cups Creamy Peanut Butter total.  (You will divide in half into two 3/4 cups.)

2 Eggs

1 ½ cups Quick Oats

Icing:

½ cup Butter (1 stick)

3 ½ cups Powdered Sugar

2 Tbsp. Cocoa

¼ cup Milk (I used some half and half )

1 tsp. Vanilla

Preheat oven to 350 degrees.

In a small mixing bowl, mix together flour, baking soda and salt. In a large mixing bowl, cream together butter, sugars, 3/4 C peanut butter, eggs and vanilla until light and fluffy. Gradually add dry ingredients, just until incorporated. Then, stir in the oats. Spread onto a greased 11 x 15 Jelly Roll Pan (cookie sheet). Bake for 12-15 minutes, or until golden brown. Cool for 10 minutes.


The icing is a two step process. First, whip the remaining ¾ cup creamy peanut butter until it becomes light in color and fluffy. Carefully spread the whipped peanut butter over the cooled pan.

In a small sauce pan on top of the stove, melt the butter. Add the milk and cocoa and whisk it in to make sure it is well incorporated and to reduce the lumps of cocoa.  Cook over medium heat, stirring constantly. Heat just until boiling. Remove from heat and add vanilla. Then, gradually add the powdered sugar. Stir until thickened. Pour over the peanut butter and gently spread over the pad of cookie bars.  Cool completely, and slice into bar cookies.

Lunch Lady Peanut Butter Bars 029

This recipe makes a huge cookie sheet of bars.  I cut mine into 24 individual squares.  They are Very rich.  The men in my house loved them and I would definitely consider these bars man sized.  I loved them too but I think if you were going to serve them at an event with a lot of women,  I would cut each of the bars again into 4 mini squares.  Ladies don’t like to take a huge bar of anything but if you cut them up into dainty little pieces they will disappear!

Lunch Lady Peanut Butter Bars 032

Those lunch ladies knew what they were doing. Put some chocolate icing on a peanut butter bar, sneak in some oatmeal to make it a teensy bit healthier and to stretch the recipe out because after all, they had a lot of mouths to feed, and a legendary elementary school memory was created.   How about you?  Do you remember a dessert treat like this from your elementary school days?    Did your cafeteria have a Ruth with a whistle?

Saturday, February 23, 2013

Sweet Olive Oil Crackers

Olive Oil Crackers 021

Last week we were at a party to celebrate a friend who was retiring from her job.  It’s a big deal.  She’s not even 50 yet and she is able to retire!!  She wants to travel with her husband and so all of us surprised her with a party to celebrate and tried to disguise our envy.  :) 

The food was delicious.  There was a gorgeous cheese tray that the retiree herself put together  (she sure has a talent for putting together an eye-catching assortment of cheeses) and tucked in a basket with some other crackers were these unique crackers that were like nothing I had ever tasted before.  They were crunchy and sweet with a hint of anise which tastes like black licorice.  The new retiree said they were purchased at The Fresh Market.

Olive Oil Crackers 013

So of course  they were first thing I looked for when I was shopping there this week.  I believe they are called Tortas but of course they were sold out on the day I was there. 

So, I dug around online and uncovered this same recipe several times on several different websites.  The ingredient list looked like all of the same flavors that I remember so decided to go ahead and I prepared a batch of them today.  The recipe I followed came from the blog Taste of Beirut where there is an excellent blog post and description with photos of how they were made. 

Here is the recipe.

Sweet Olive Oil Tortas

5 ounces of extra virgin olive oil 
peel of half a lemon or orange  (I used the peels from both.)
1 tablespoon of anise seeds (or ground anise) (I used seeds.)
3.5 ounces of white wine (or fresh orange juice)  (I used the juice of 1 fresh orange and 1 fresh lemon.)
2 cups of unbleached all-purpose flour

1/2 teaspoon of baking powder
1/4 teaspoon of ammonia powder (I didn’t have any of this but will shop for it for the future.  It helps to make the crackers more crunchy.)
3 tablespoons of sugar plus more for sprinkling on the crackers
1/2 teaspoon of cinnamon plus more for adding to the sugar sprinkled on the crackers
1/4 cups of sesame seeds, toasted till golden  ( I toasted them in a dry saute pan on top of the stove.  Toast them till they are a light golden brown but be careful not to burn them.)

Directions:

Peel the lemon (yellow part if possible only) to get a long strip. Place the lemon peel and the olive oil in a small skillet and heat the oil until the peel starts to brown. Remove the peel, add the anise seeds and cool the oil.
Sift the flour, baking powder and ammonia powder in a mixing bowl. Add the cinnamon  and sugar and mix in.
Add to the flour mixture the olive oil, anise seeds, wine or juice.  Mix to combine well. You should obtain a moist and firm dough.
Let the dough rest for 30 minutes in a bowl or plastic wrap. If not using right away, cover with plastic wrap and refrigerate for one day.
Line several cookie sheets with parchment paper or silpat. Place 1/2 cup of sugar (with a pinch of cinnamon if you like) in a small bowl. Place the sesame seeds in another small bowl.
Form small  walnut- sized balls of the same size if possible from the dough and line them up and cover them with a piece of plastic wrap. Take one ball at a time and press on it with your fingertips on the parchment-lined cookie sheet till it gets as thin as possible,  ideally 1/2 mm or 1/16 of an inch.
Sprinkle the crackers with a bit of sugar and sesame seeds.
Bake in a preheated 325F  oven for about 15 minutes or until browned around the edges and dry.

These are a delicious and unique cookie/cracker that we enjoyed with a glass of wine and an assortment of cheeses.  But I also think these would be very nice to enjoy with a hot cup of tea or coffee.  They are a bit labor intensive but so worth it!

Friday, February 22, 2013

Low Carbing It

Bacon, Lettuce, Tomato Roll Ups 008

Today’s lunch.  Bacon, pepperjack cheese and tomatoes wrapped up in Romaine lettuce leaves. 

I slipped.  For the past 6 weeks I have been humming along on a new diet.  I have been experimenting with a low carb diet and doing pretty well with it.  I loved how NOT hungry I was all the time.  I loved how nothing I was now eating did not give me indigestion anymore, and of course I loved how much looser and more comfortable my clothes were becoming.  But yesterday I slipped.  I indulged in a lot of the foods I have been avoiding over the last few weeks.  And it taught me a lesson.  I don’t feel good when I eat all of those foods!  My Mexican dinner last night of chips and salsa, a mini Margarita, an enchilada, and a chalupa with re-fried beans and a big chocolate brownie for dessert taunted me last night while I was trying to sleep.   It wasn’t pretty!

This is the Food Pyramid that makes the most sense to me.

Now I don’t expect to go hardcore low carb the rest of my life and never eat another piece of fruit or bread.   And while I don’t expect to go “Paleo” and eat like our caveman ancestors ate, a lot of that diet makes sense.  Man has been on the earth for thousands if not millions of years and wheat and agriculture has only been in existence in recent history.   And look at all the health problems we have today. 

One of the hard things about it for me is that  I LIKE  to BAKE bread and make desserts for my family and friends.  I like to experiment and try new foods and will continue to do so.  But, I also expect to experiment a bit more with foods with less sugar and less wheat.  I’ve done a lot of reading lately and I don’t like the idea that a lot of our food today has been genetically modified.  The wheat in our breads and flours today is not the same wheat our grandmothers and grandfathers ate.  So I have been trying out some alternative flours like almond flour.  A lot of what I have been eating could be considered gluten free.  I know it seems like gluten free is all the rage right now but seriously, why are so many more people feeling better these days when they avoid wheat?  I think it has something to do with how the food industry has tampered with the genetics of the wheat we now eat in the name of higher production and yields.

I usually don’t use my blog as a platform to spout off about politics or controversial issues.  I just wanted share that I have been changing some of the things I have been eating and I feel better.  I was also hoping to hear your thoughts on eating less wheat and wondering if any of you out there have had success with eating a low carb diet?

(Also, I have just created a page above on my menu bar called Low Carb Ideas.  It will be a work in progress and I will be adding any tips and tricks I have learned along the way!)

Thursday, February 7, 2013

200th Pride and Prejudice Anniversary by Jane Austen

Photo: January 2013 marks the 200th anniversary of the first publication of Jane Austen's Pride and Prejudice. Download a free audiobook version to celebrate! iTunes - http://s.coop/19xp0 MP3 - http://s.coop/19xp4 plus free Austen ebook downloads from the library http://s.coop/19xpk

Did you know that it is the 200th Anniversary of Jane Austen’s Pride and Prejudice?  It is very close to the top of my list of favorite books. 

It’s a story that never seems to loose it’s appeal.   At least not for me.  And I am a big fan of every movie or mini series that takes it’s turn telling the story of Miss Elizabeth Bennet and Mr. Fitzwilliam Darcy.  I love the manners and etiquette of the day.  The clothing and their way with words.  No one ever says anything in the direct and to the point way people seem to talk today.    My favorite version is the BBC series from 1995.  Jenifer Ehle and Colin Firth made the perfect Lizzie and Darcy for me.


“It is universally acknowledged, that a single man in possession of a good fortune must be in want of a wife.”

 Pride and Prejudice    

“Oh Mr. Bennet!  Have you no compassion for my nerves?”

     PRIDE AND PREJUDICE

The Bennet Family.  Mr. and Mrs. Bennet, Lydia, Elizabeth, Jane, Mary, and Kitty.


Mr. Collins and his patroness The Lady Catherine de Bourgh, mistress of Rosings, and his wife, the former Charlotte Lucas. 


The silly youngest sister Lydia with her handsome (and loathsome) Mr. Wickham.

“Ah, Jane, I take your place now, and you must go lower, because I am a married woman.”

     Pride and Prejudice 1995 -    

And in the end, Jane marries Mr. Bingley for “she could not be so beautiful for nothing”.  And Elizabeth marries Mr. Darcy much to Lady Catherine’s dismay and becomes mistress of Pemberly.

Mr. Darcy emerges from the lake.

And in case you missed it, here is the iconic moment that women the world over witnessed and it forever seared the image of Colin Firth as the only possible Mr. Darcy.  At least in my lifetime!

And before I go, Did you know that you can download Pride and Prejudice by Jane Austen for FREE from Amazon to your Kindle? 

How about you?  Are you a Jane Austen fan?  And if so, which is your favorite book?

Happy Anniversary Jane!!

Tuesday, January 29, 2013

Orzo with Lemon, Basil, and Parmesan

Lemon Parmesan Orzo 004
I was getting so tired of making potatoes as a side dish for dinner that I thought I would try something new. I gave this recipe a try for the first time and it won’t be the last. We are having an unusually mild and Spring like day on this end of January day and so I thought this would be a nice change of pace and taste a bit more like spring with the freshness of the lemon zest called for in the recipe. I used dried basil but believe me when I say I’ll be making it again with fresh basil from the garden or Farmer’s market later this summer! Use freshly grated Parmesan Reggiano if you have it. And if not, the stuff in the tall green can works just fine! :)

Ingredients:

1 cup uncooked orzo ( 8oz. or half of a package)

1 Tbsp. olive oil

1 Tbsp. butter

1-2 teaspoons lemon zest (I used a Microplane Grater and used the zest of 1 whole lemon.)

2 garlic cloves, pressed

1/4 cup chopped fresh basil (I used about 1 tsp. dried basil.)

2 tablespoons (1/2 ounce) grated Parmesan Reggiano cheese

1/4 teaspoon salt

1/4 teaspoon black pepper

Basil sprigs (optional)

Directions:

Cook the orzo according to package directions.  Drain and leave in the colander.  In the same pot that you boiled the orzo in, sauté  over medium heat, the garlic, lemon zest, and basil in the olive oil and butter.  Sauté just enough to take the “rawness” out of the garlic and the flavors have a chance to mingle.   Remove from heat.   Add the  orzo and mix well.  Add the Parmesan and stir together.  Add more to taste.     Taste and then sprinkle with salt and pepper.   Garnish with fresh basil leaves and thin slices of lemon if you like.