Tuesday, December 8, 2009

Christmas Bulb Jackpot!

Christmas Bulbs 031

I feel like I hit the Christmas Bulb Jackpot at the Goodwill today. $1.99 for each box of ornaments!!

Christmas Bulbs 005

The striped ones are my favorite. They have that retro thing going on! Do I have enough containers??? Because none of these are going on the trees. No room! And I don’t want to have to get another tree. (And I think another tree would put hubby over the edge.) :)Christmas Bulbs 012

A couple of weeks ago I brought home this wonderful glass terrarium. I haven’t had a chance to boast about it to you all yet so let me take the opportunity to do so today! Yes, it was goodwill find and I honestly only paid $2.99 for it. Honest! See…zoom in on the orange price tag that I left on the side for you. I couldn’t believe my luck that day. Well, it has been sitting empty until today when I filled that baby up with some orange and blue Christmas bulbs.

Christmas Bulbs 008

So bright and colorful!

Christmas Bulbs 021

Next stop….the mantle where I filled a couple of Hurricanes with these burgundy and green bulbs.

Christmas Bulbs 020

Then it was time to visit the dining room….

Christmas Bulbs 029

Here are my favorites of the bunch. These striped retro bulbs have some texture to them and came in orange, green, and blue.

Christmas Bulbs 028

Remember my white “Fleur de Lis” bowl…another great Goodwill find? (I used this bowl on my Thanksgiving table and filled it with the natural decorator balls that you can still get for free with the purchase of 4 cards from American Greetings.) Today I replaced those natural balls with my new retro Christmas bulbs and filled it to the top.

Christmas Bulbs 031

May your Christmas be colorful and bright!

I am linking this post up to Bobbypins Booardwalk where she is hosting a Bragfest!! You know I am all about bragging when it comes to my GW finds. Stop by for more bragging!

Monday, December 7, 2009

Decoupaged Vintage Ornaments: A Gift For The Girls

Bunco Ornaments 010

A GIFT FOR THE GIRLS. The Bunco Girls. All 12 of them!!

Here is what I have been working on in my spare time lately. ;) I am planning to give one of these ornaments as a Christmas surprise to each of the “girls” in my Bunco group. Our big end of the year Bunco Christmas Party is later this month but I wanted to get these finished beforehand. Bunco is another one of those things that I was introduced to when I moved to the South. If you are not familiar with Bunco it is a dice game. It’s pretty mindless and easy to play while chatting, eating treats, and enjoying a cocktail. :)

There are 12 of us in our Bunco group and I think that only one of my Bunco girlfriends knows that I blog so I feel pretty safe showing these to you. I want them to be a surprise and I am hoping that this post slips by the one member of my group who does read my blog!

Bunco Ornaments 018

BUNCO: THE EARLY YEARS

The idea came to me when I first saw this vintage photo somewhere online and loved how all the girls in it looked. When I counted and saw that there were 12 girls in the photo, the idea hit me to do something with it for Bunco since there are 12 of us in our group. I decided on putting “Bunco: The Early Years” on each ornament and then had fun deciding which “Bunco Babe” got to be which “Vintage Babe” in the photo. :)

Bacon Eggs Candies 005

Supplies Needed:

Canning jar lids and rings: (use wide mouth lids and rings for larger ornaments and pint sized lid and rings for smaller ornaments) I needed to use the Wide Mouth larger sized lid and rings because I had a lot of names to fit on the photo of the 12 vintage ladies. ( A box of 12 cost me $4.99)

PHOTOCOPIED image: if you use words…photocopy them too!!!!! Now is a good time to use your jar lid as a gauge for how large your image needs to be. Make sure it is going to fit in the size of your jar lid. You do not want your image to be too large or too small.

Spray paint: I used American Accents Rust-o-leum Heirloom White

Mod Podge: (I used the original Mod Podge…I experimented with the extra glossy formula but I did not like it…looked too thick to me.)

small paint brush

Tacky Glue

Red ribbon for the hanger: ( I also added a red/white striped ribbon around the edge of each ornament)

Sharpie Permanent Ink Pens: (I used a red sharpie to write Merry Christmas 2009 on the back of each ornament and used a green Sharpie to draw some holly leaves)

First I found a vintage photo that I liked and I printed it out. Then I had it photo copied as many times as I needed for the number of ornaments I wanted to make. This is an important step because if you try to decoupage the image from your home computer the ink with run, and change colors and looks terrible. Trust me, I learned this the hard way! (If you want to use words in your project…photo copy them too!!)

Step 1: Take your photo copied image and use a jar lid to trace a circle around your image so that it fits perfectly in your finished ornament. Cut the circle of your image out and set aside. Now is a good time to cut out your “words”. I cut each word out individually which made it easier for placement. (Now is also a good time to assemble your ornament as a “test” ornament to make sure everything is going to fit and to get an idea of how your finished ornament will look.)

Step 2 : Assemble the jar lids. Glue the jar lid to the ring with Tacky Glue. Let dry.

Step 3: Spray paint the the back side of your ornament. Let dry. Turn over and spray paint the front side. This step may require a couple of coats.

Bunco Ornments 016

Step 4: Decoupage the image to the lid and ring set. Start by painting the Mod Podge to the inside of your ring and then paint the back side of your circle and place it in your ornament. Then finish with a coat of Mod Podge directly on the image and make sure it is completely sealed and there are no air bubbles.

Bunco Ornments 002

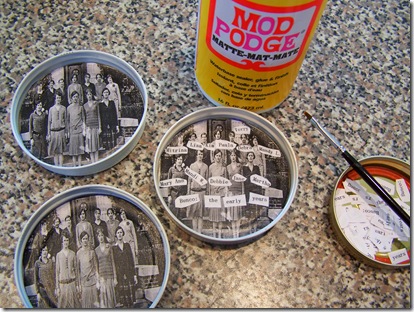
Step 5: Now you can start decoupaging your words on the ornament. Use the same 3 step process, Mod Podge the ornament, Mod Podge the back of the words, then give a coat over the top to seal. Let dry.
Bunco Ornments 006

Bunco Ornments 014

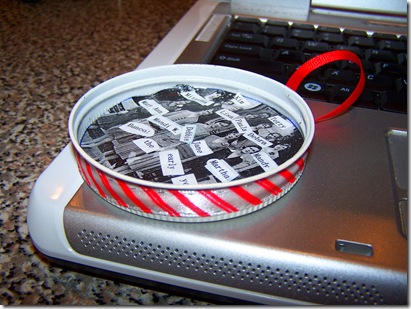
Step 6: Cut a length of ribbon to wrap around the edge of your ornament allowing extra a the top if you want to make a bow.

Step 7: Apply Tacky Glue around the outer side edge of the ornament and wrap the ribbon around the ornament. (I did not tie a bow on mine). Add any other embellishments you might like at this time.
Bunco Ornaments 019

Step 8: Sign the back, add a special message and don’t forget to put the date on it! I used a red and green Sharpie Permanent Ink Pen for this.

Bunco Ornaments 018

Step 9: Cut a length of thin ribbon for your hanger. Loop it, dab on some Tacky Glue to join it together and then add a drop of Tacky Glue to the to outer edge on the back to adhere the ribbon hanger to your ornament. Let dry completely before you try to hang it.
Bunco Ornaments 005

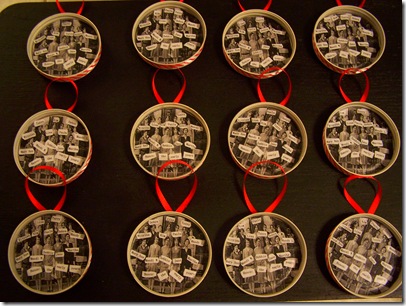
And here are the 12 sweet Vintage Bunco Babes on the front side….

Bunco Ornaments 013

And here are the backsides with a Merry Christmas Wish for 2009.

I can’t wait for our Christmas Bunco Party so that I can give these out just like Santa!

image

I am going to link this up to DIY Show Off Holiday Highlights. Stop by for some other great Holiday DIY Ideas!

I am also going to link this up to the Shanty 2 Chic Rust-0-leum Revamp Party. Stop by here to see what transformations can be make using Rust-o-leum Spray Paint.

And I have linked this post up to Make It For Monday over at Cottage Instincts. Drop by for a visit!

I am also linked up to Kate's Centsational Girl for her fabulous ornament party. Gorgeous ornaments here! Come look!


Sunday, December 6, 2009

It’s Beginning to Look a Little Bit Like Christmas

We finally got started with the decorating inside the house. Well, I should say “I” instead of “We”. The other half of my “We” watched football while I dug around in the storage boxes. The two trees are still bare but I found some of my Santas and some of the other little things I like to put out each year. I really need to get more organized. I am still missing some boxes and not sure where to look for them!

Christmas Decorating 029

The photo frame above is waiting for the First Year College Student daughter to come home for Christmas so that we can take the annual Christmas picture. I found the frame at TJ Maxx earlier in the week. It is nice and sparkly. It’s just waiting for a great photo.

Christmas Decorating 003

I actually have two sets of these little elves. I bought this first set about 20 years ago at a Church Bazaar.

Christmas Decorating 022

Then about 10 years ago I saw this set at another craft show and had to have it too. For all you crafter out there these would make a cute project!

Christmas Decorating 009

I was able to put some of my Santas together. The ones I could find anyway. There are more in a box somewhere. Now to the real work. The trees. I hope to make some progress in that department real soon. :)

Saturday, December 5, 2009

Mint Chocolate Delights

It is Christmas Cookie time! I made a batch of the most wonderful cookie today. Nestle Toll House has a “limited edition” bag of morsels called Dark Chocolate and Mint! And of course on the back of the bag is a great recipe on how to use them. They are called Mint Chocolate Delights and it is the perfect name for them.

Mint Chocolate Delight Cookies 011

I have a feeling these morsels are only going to be available this time of year. I have seen mint chips before but not a combination of mint chips and dark chocolate chips. I think I am going to stock up on several bags so that I can make these later in the year. They are a big hit with my husband and our 10th Grade Son who is also the pickiest eater I have ever seen, and today he told me that he actually prefers dark chocolate. This is a big surprise to me! These cookies are moist, minty, chocolaty, and fudgy all at the same time.

Here is the secret ingredient!

Mint Chocolate Delight Cookies 003

Here is the recipe (because sometimes different bags carry different recipes. This is the one you want to try.)

Mint Chocolate Delights

2 Cups of All Purpose Flour

2/3 Cups of unsweetened cocoa powder

1 tsp. baking soda

1/2 tsp. salt

1 Cup (2 sticks) butter, softened

2/3 cup granulated sugar

2/3 cup brown sugar

1 tsp. vanilla

2 large eggs

1 10 ounce package of Nestle Toll House Dark Chocolate and Mint Morsel (1 and 2/3 cups)

Preheat the oven to 325 degrees.

Combine flour, cocoa, baking soda and salt in small bow. Beat butter, granulated sugar, brown sugar and vanilla extract in large mixer bowl until creamy. Add eggs, one at a time, beating well after each addition. Gradually beat in flour mixture. Stir in morsels. Drop by well-rounded tablespoon onto ungreased baking sheets.

Bake for 11 to 13 minutes or until cookies are puffed and centers are set. Cool on baking sheets for 2 minutes; remove to wire racks to cool completely. Makes about 4 dozen cookies.

For mini sized cookies: prepare dough as above. Drop by well-rounded measuring teaspoon onto ungreased baking sheets. Bake for 9 to 10 minute or until cookies are puffed and centers are set. Makes about 7 dozen mini cookies.

Mint Chocolate Delight Cookies 011

Enjoy!

I am linking this post up to the Virtual Cookie Exchange over at Little Llamas Blog. Stop by for some other great cookie recipes.

I am also linking up to Darlene's Our Creative Life where she is hosting a Cookie Recipe Party.
Stop in for even more recipes!

Thursday, December 3, 2009

Top 12 Favorite Movies to Watch During the Holidays

I got to thinking about my favorite movies to watch this time of year. Here they are in no particular order.

imageimage

1. Love Actually: I am crazy for almost any movie that comes out of England...that quirky Brit humor. And how funny was that aging rocker?

image image

2. Christmas in Connecticut: The original Martha Stewart.

image image

3. White Christmas: Love this each time I see it. Great dancing and have you ever seen a waist that small on a human being?? And who drinks buttermilk when they can’t sleep??? (cough, cough, gag, gag.)

image

4. While you were sleeping: I love this movie anytime of year but especially at Christmas. Who wouldn’t want to be a part of that family?

image

5. Home Alone: So entertaining. Love Chicago in the wintertime.

image

6. Elf: Such a cute and original move.

image

7. The Holiday: Cameron Diaz and Kate Winslet swap houses over the holiday. Sweet movie and you get a taste of England too!

image

8. The Family Stone: Just saw this one on TV. We finally got digital cable and we keep finding new channels and this was on just the the other night. It makes me cry every time but I just love it. Quirky. And I love quirky!

imageimageimage

9. A Charlie Brown Christmas: Technically not a a movie but it sure is cute and it takes me back……wayyyyyy back. :)

imageimageimage

10. Rudolf the Red Nose Reindeer: Again, not a movie but it is beloved by many. I Love Herbie the Dentist. This show made me cry when I was little and the Abominable Snowman scared me big time!

image

11. It’s a Wonderful life: This is my husband's favorite holiday movie.

image

12. About A Boy: Who knows all the words to "Santa’s Super Sleigh"?

I know I am forgetting some good ones. I have to thank Kelly at Kelly at Dare to be Domestic who just posted her top 10 holiday movies a day or two ago and made me think about what my favorites are. What are some of your favorites?

Wednesday, December 2, 2009

Snowflakes

A few weeks ago I was in the Dollar Store and picked up these gigantic snowflakes. They are clear and made of plastic and very lightweight. So 5 dollars and 5 snowflakes later I took them home with absolutely no idea what to do with them. I thought maybe I would hang them outside in some of the trees but today as I walked around the house looking for a place for them I decided to try and hang them from the light fixtures in the kitchen and dining room. I absolutely love them hanging this way.

Snowflakes 006

I placed three of them hanging off of the bottom of the kitchen light.

Snowflakes 009

And 2 of them are now hanging off the chandelier in the dining room.

Snowflakes 004

I have still done next to nothing inside the house for decorating for Christmas.

Snowflakes 001

But these snowflakes are helping to put me in the mood!

Stop by Tales from Bloggeritaville for Thrifty Thursday and see some other uncovered bargains.

Tuesday, December 1, 2009

Retro Red Magazine Candle

Noel Candles 011

Retro Red Magazine Candle

Many, many years ago I remember a Christmas decoration that my Mom made and I just loved them. She made a set of Christmas Carolers out of folding what I think were old Reader’s Digest magazines. They were so cute and I always remembered them and thought that one day I would try and make them for myself. Then one day not too long ago I came across a project on a blog somewhere…forgive me not remembering the site I saw it on…but she used this same magazine folding technique and she made a pumpkin. That started me thinking about making something for the holidays and I came up with this candle. (If I get good at this I might try and reinvent the Christmas Carolers one day. :))

And here they are all finished! I am so happy with the way they turned out.

Noel Candles 006

The smaller candle that I made was assembled using two “Prevention” magazines. I like this size magazine because it is short (like me) :) I also made a second candle out of the taller “More” magazine and I used two of them as well. ( used a Brazil nut on the smaller candle for the flame and on the larger candle I used a walnut.)

Here is how to make one for yourself.

Supplies Needed: (for one candle)

2 of the same size magazine and both should have approximately the same number of pages.

Tacky Glue

Spray Paint

Brazil Nuts or walnuts (you want your nut to look “flame-like”

tooth picks

Gold metallic craft paint

paint brush

Step 1: Start by folding the front and back covers in to the spine of the magazine. Then at the front of the magazine start folding the pages into the spine lengthwise so that all the pages are folded into the spine moving in the same direction. Fold both magazines this way.

Noel Candle 002

Step 2: I used the Tacky Glue to attach the spines of the magazines together and the entire front and back covers together so that both magazines were joined and I had a nice complete cylinder. I used chip bag clips to pinch the magazines together or you could secure it with big paper clips. ( I encourage you to use Tacky Glue because it is strong enough to hold this together. Feel free to use a strong “crazy” glue as well. Let dry completely.

Spray Paint 009

Spray Paint 011

Step 3: Spray paint your candle. Let dry in between coats. Don’t worry if you still see some of the print. That is part of their charm!!

Spray Paint 022

Step 4: Paint your Brazil or Walnuts with gold metallic paint for your “flame”.

Step 5: Drill a small hole in your Brazil or Walnut so that you can insert the toothpick or floral pick in it. (I actually had to drill the Brazil nut but the Walnut let me push a tooth pick into the bottom without drilling.)

Step 6: Put some Tacky Glue on the length of toothpick that will be inserted into the nut. Push the toothpick into the nut. Let dry.

Step 7: Insert the tooth pick with your painted nut/flame into the center of the top of your candle.

Step:8 Embellish if you wish. I added a ribbon around my larger candle and added a gift tag to my smaller candle.

Noel Candles 014

I think I like the smaller “Prevention” magazine sized candle the best. The “More” magazine candle is huge! It would be a good size if you needed something big and tall for maybe on top of a bookcase or cabinet. Either size though is really cute. Looks very retro to me.

I am joining Transformation Thursday over at The Shabby Chic Cottage. Stop by for other great projects!