Tuesday, December 28, 2010

Southern Living in the Wintertime

For the most part I think we have adjusted quite well to living in the South even though I can’t help but feel that I am still really a Mid-Westerner.   Well, I did until a visit to the Chiropractor when my husband threw his back out a few months ago.  Now I don’t know what we are.   We were meeting the Doctor and having some pleasant chit chat when my husband mentioned to the Doctor that we  noticed he was from Iowa according to his bio and that we were from the Mid-West too. “Oh really?”  he said.    “Where are you from. “    “Michigan!”  we both said at the same time.  The Doctor got the strangest look on his face and  mumbled something about Michigan not really being part of the Mid-West.  Oh really?!  That was news to me!   Is this how Iowans see Michiganders?  I wonder how the Missourians or people from Indiana feel?  I had always felt a kind of kinship with them.  Our Chiropractor made us feel like posers.   He was a fine  Doctor  but I think he needs to look at a map and now my sense of identity is further confused. 

But the Southerness continues to seep in.  I can scramble for bread, milk, and water like the best of them when the prediction for snow comes.  I can fully appreciate the beauty of a magnolia wreath at Christmas time and can immediately spot the Southern Ham and pepper jelly on a buffet table.   And we all love our BBQ and I catch all of us singing along a bit more to the radio when a country song is on.   

And then you have our children who have pretty much grown up here in the South.    Our Daughter is a Tarheel through and through and tonight she will be a attending a Debutante Ball as the guest of her best friend and room mate.   It is going to be quite the formal affair.  A conservative and very formal dress was required.  I can’t wait to see the pictures and hear all about it.   And our son who has always been a Chick Fil A man, has decided that Biscuitville is his new favorite fast food breakfast of choice. 

A Debutante Ball and Biscuitville all in the same month.  Not a bad thing.   It’s just a bit much to process.  So you see as I said, the Southerness continues to seep in and I am okay with it.   But, I don’t care what any one says, I will never be convinced that Pimento Cheese is a good idea. :)

Sunday, December 26, 2010

Big Snow

Christmas Snow 2010 003

It has been 60 years since it has snowed this much here in Greensboro, NC on Christmas.  It’s a record breaker!  And yes, those are my Christmas pumpkins you see under the tree.  It’s a running joke.  My neighbor has a set too.   :)    My friend Melanie over at Southern Comfort in a Northern Life asked me if they were stenciled when I posted this photo on Facebook earlier today.  :)

Wednesday, December 22, 2010

Stenciled Gift Bags

Stenciled gift bags 035

Have you ever had one of those weeks where nothing goes as planned and it’s one unexpected thing after another?  And it’s only Wednesday!  Nothing terrible, just lots of surprises.  Today was one.  Our son needed to have his wisdom teeth  taken out and on Monday we had a consultation appointment with the Oral Surgeon.  There was an opening today which was 2 days later and we took it.  He looks a bit ragged, a bit chipmunk-y, and when he was waking up in the recovery room he got a case of the giggles.  So funny…where was my camera then?! :)

Stenciled gift bags 038

Anyway, he’s on the couch sleeping now and I am trying to get some last minute Christmas stuff done.  Can’t go shopping today so I stayed in and finished stenciling some gift bags.  These were done with the same stencil that I used on my Hand Stenciled Towels and my Hand Stenciled Christmas Napkins. 

Stenciled gift bags 034

I found the stencil at Maison de Stencils and you can buy the brown paper gift bags with the handles at Michaels or any craft store very inexpensively  Pick up some tissue paper while you are there and you are ready to go.    Tick, Tick, Tick…….the Christmas countdown is dwindling.  Doing my best here but I already know it’s not all going to get done.  And I am almost okay with that.   How about you?  Ready?

Saturday, December 18, 2010

Vintage Santa Christmas Ornaments


Christmas Santa Ornaments 2010 034

My Christmas Spirit is improving. :)  Our daughter finished her last exam and came home yesterday for Christmas break.  My Christmas shopping is almost done.  And my Christmas cards were sent out last week.  Yes!  Last week! That is a record for me.  Usually, the cards are one of the last things to get done.  Not this year.  The Christmas decorating inside our house could use some more attention but I am not so secretly hoping our daughter wants to take over the decorating of  the big tree.  We shall see….

Christmas Santa Ornaments 2010 016

So, off and on throughout the day yesterday, I started making these Vintage Santa Ornaments.  I have never really made anything like this before but it was a a lot of fun and now I have a little production line going.  I am thinking I might make some more and write our names on Santa’s beard and use them as place cards too. 

I got the idea when I was looking at all the Thrifty Thursday projects posted over at  Tales from Bloggaritaville and the ornament posted by SWAMPGIRL caught me eye.  She made an ornament similar to this and I just loved it. She folded her paper differently from the way I did mine.  And one reason it caught my eye was because I had saved the same Santa face from last year when it was posted by Karen at The Graphics Fairy.  I knew that I wanted to make something out of that Santa.  It just took me about a year to figure out what I wanted to do.Christmas Santa Ornaments 2010 002

I think these ornaments look retro and vintage with the music paper.  Last summer I found an old children’s music book at the Goodwill and bought it for $2.00.  I finally had my chance to use it.  The Graphics Fairy also has some music sheets you could print out if you don’t have an old music book you want to take apart.  

Here is how I made my ornament:

I tore out a page in the music book and folded the page in half and tore it into two pieces. Then I took each half and tore them in half so that I had 4 strips  each approximately 1 and 3/4 inches from each sheet of  music. 

I started by taking each strip and folding the end of it down approximately 1/2 inch.   Then I flipped it over and folded it back over on itself another 1/2 inch and continued to fold the entire strip so that it looked like an accordion. 

Christmas Santa Ornaments 2010 009

After you get two of your strips folded, glue them together into one long folded strip.  Let Dry. 

I think Tacky Glue works best for a project like this. 

Smooth out the strip a bit and run a line of glue down one of the long edges and then sprinkle it with glitter.  Let dry. 

I like the Martha Stewart Glitters the best.  Beautiful colors and textures to choose from. 

While the strips are drying,  Cut out two circles of heavy card stock to fit in the middle of your ornament.  I used a sparkly paper and this is where I glued my Santa face.   You can find paper that is already glittered at your craft store.   I traced around the bottom of a small jar for my circles and then cut them out. 

You will need to glue your accordion strip to itself to form a circle. First tighten your strip up by folding it back into it’s accordion shape.  Stretch it out just a tiny bit and then glue it to itself and make it into a circle. Let it dry. 

Now comes the tricky part.  After your strip is dried and glued together in a circle, you will have to gently push and bend it towards the center so that it forms the circular fan shaped ornament and you want to make it so that the bead of glitter is on the outside edge of your ornament.

 Christmas Santa Ornaments 2010 039 Christmas Santa Ornaments 2010 041

Now you will need to use your Tacky Glue and cover the back of one of your circles with enough of the glue so that is will “catch” in several areas on your ornament accordion circle .  Place in the middle and then use something flat to press down on your circle while it dries.  I used the bottom of a glass of water.  You want it just heavy enough for the pressure you need to keep it flat while it dries but not too heavy that it smashes your ornament.  Let dry.

Flip your ornament over and glue your second circle to the center of the back of your ornament for a finished look. Let dry.
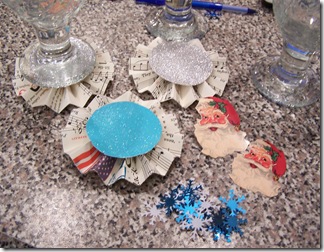
Christmas Santa Ornaments 2010 043Christmas Santa Ornaments 2010 045

Now you can glue your Santa Face or really anything you want in the center of your ornament. 

I copied my Santa image to a Word file and then duplicated as many as I needed and then printed them out on Photo paper for a glossy finish and for a heavier weight of paper.  Card stock would also be good here. 

After cutting out my Santa face, I glued it to the center of the glitter circle in the middle of the ornament. 

I then glued on a couple of Snowflakes.  (Not very retro since the snowflakes are made of plastic but I liked the way they looked.)  Feel free to embellish any way you would like. 

Last step is to take a piece of ribbon and cut it and make a hanger for your ornament and glue it to the back.

Christmas Santa Ornaments 2010 035

I’ll bet you can cut a neater and rounder glitter circle than I did here.  :)  oops.

Christmas Santa Ornaments 2010 015

And there you have it!  I think these are very cute and I plan to make several more now that I now what I am doing.  :)  Merry Christmas!

I am linking this post up to Tatertots and Jello.  More than 300 other Christmas projects to be inspired by!

And I am joining Linda for her Christmas Open House over at Coastal Charm.

Thursday, December 16, 2010

Peppermint Garlands

Candy garland 003

SNOW DAY!  Oh, the weather outside is truly frightful.  And staying home and baking MINT CHOCOLATE DELIGHT COOKIES (click for the recipe)  and making candy garlands today has been delightful!  No school today and the land of cheese can wait.  Christmas shopping can be postponed till next week.  I am almost done anyway.  How about you? 

I have been working on making a candy garland for the last few days.  This is easy to do and you can sit on the floor with a big pile of peppermints and some red ribbon and work away while watching TV.  I had three different strands going.  One was the strand of the red and white peppermints in the photo above.

Candy garland 004

     This was made from a bag of mixed candy.

Candy garland 009

And for this one I alternated between the red and white peppermints with the green and white peppermints.  I used green ribbon on this one too. 

If you want to make one of these all you need is an inexpensive bag of peppermints and I like to use the real thin satin ribbon.  I cut my ribbon pieces about 10 inches in length.  Take two pieces of your candy and tie them together tightly with a piece of your cut ribbon.  Tie a knot first and then finish it with a tight bow.  That is all there is to it.  Continue this way until you have the length you want.  Make it nice and long for easy draping on your Christmas tree. 

Tonight is our End of the Year, Christmas Bunco Party.  Some years we have done a “Dirty Santa” which I think is hilarious good fun but in the past few years we have been asked to bring a gift to exchange.  A couple of years ago we exchanged fancy wine stoppers.  Last year we exchanged soup bowls, and this year we were asked to exchange hand lotion.  Our hostess always puts on a fabulous party with great food and drinks.  Her husband stays long enough to bar tend…and he is a great bartender...and then he disappears into the night and lets the ladies have their fun.  He is a smart man. :)

Tuesday, December 14, 2010

Trader Joe’s Dark Chocolate Sea Salt Caramels

Trader Joes Salted Caramels 003 Trader Joes Salted Caramels 016

Trader Joes Salted Caramels 006 Trader Joes Salted Caramels 014

Trader Joe’s Dark Chocolate Sea Salt Caramels

Delightful,

inexpensive,

will make your mouth water,

can’t stop at just one,

will make you weak in the knees,

and worthy of gift giving.

And there is only one left in the box. :(

Sunday, December 12, 2010

Some Fun Christmas Recipe Links

It’s a cold, wet, and dreary day here today so I am staying indoors and doing some online Christmas shopping, reading blogs, wrapping presents, and browsing the internet.   Here are just a few of the things I found that I either want to make, buy, enjoy, or simply admire.

image

How cute are these SNOWMEN CUPCAKES?  I found them at DeviantartChristmas Fun with colored icing and marzipan.  And it looks like one of the Snowmen hats is made out of part of an Oreo cookie and a mini Oreo on top of that. Wish I liked coconut more than I do.  Too cute.

 image

These HAM AND CHEESE SANDWICHIES, compliments of BUTTERYUM,  would be so great to serve at a party. 


image

Mmmm…PEPPERMINT MOCHA FUDGE!  This can be found over at Paris Pastry.

image

Our Best Bites always has the best recipes.  I love browsing this blog.  This is CINNAMON-CARAMEL-CORN-WITH-PECANS AND WHITE CHOCOLATE.

image 

Carla over at Cosmo Girl’s Emporium posted this delightful adult beverage last week.  A CANDY CANE COCKTAIL IS my kind of martini fun!

image

And this has to be the most elaborate BOUCHE DE NOEL I have ever seen.  I found it at Victor Benes Bakery.  Alas, the European bakery that created this masterpiece is located in Los Angeles  which is a tad too far away for me.  But I can certainly admire from afar can’t I?